


Tools:
Hack saw
Drill
Pop Rivet Gun
Measuring Tape
Materials:
PVC Pipe, 1 inch x 6 ft, schedule 40, grey color
Black duct tape
550 Para cord (color optional) approx 50 ft.
PVC pipe connector, 1 inch, female, 3 each.
PVC pipe connector, 1 inch, male, 2 each.
PVC pipe cap, 1 inch dia., 1 each.
Metal conduit pipe connector, 1/2 x 1/2, 1 each.
Threaded rod, 1/2 inch dia., 1 inch length., 1 each
Cap to fit threaded rod, 1/2 inch dia., 1 each.
Soft plastic lids from coffee can. 2 each.
PVC glue
PVC pipe cleaner (optional)
Rubber "O" rings that fit around the male connector ends.
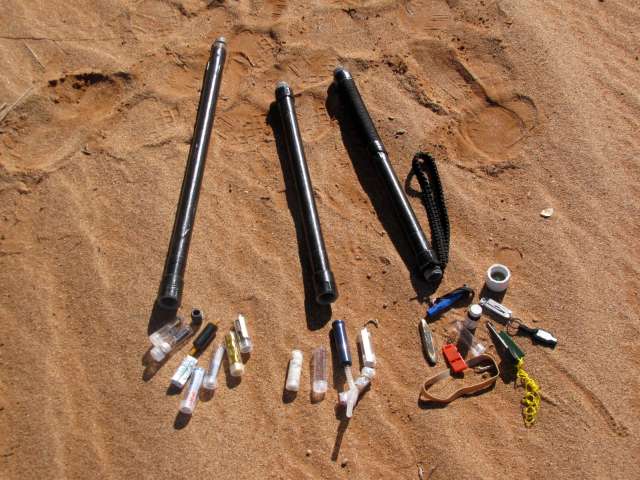
Dime or penny size coin collecting plastic tubes.
Directions:
Measure the pipe to cut out two 1 1/2 foot lengths. This should give you three sections with one section measuring 3 feet and 2 sections measuring 1 1/2 feet each.
Use the sand paper and smooth off the areas that were cut to remove burrs. Then roughen the outer sides of the tube where the PVC glue will go when applying the pipe connectors to give it a better grip.
Starting at the top part of the staff, take one 1 1/2' section and attach one female connector at the top. Take a rubber mallet or piece of wood to tap the connector down after applying the glue and connector to ensure it is seated all the way down.
On the same staff, take and place the bottom on top of one of the plastic coffee lids and trace out a circle of the end. Cut this circle out and place it in the top of the female adapter that has no threads. Next apply PVC glue to the same end of the staff and then attach the female connector ensuring that the end with the plastic disc is facing up and the threaded end of the connector is facing down. Tap this end as with the first connector to ensure it is firmly seated. Place the top cap on the top end.
On the second 1 1/2' section glue a male adapter to the top and tap it down as did with the first section. Attached the female adapter and plastic disc to the bottom as was done on the first 1 1/2' section.
On the third section (3 ft section), glue a male adapter to the top and tap it down as did with the other two sections. At the bottom of this section, insert the 1/2" conduit coupler until the bottom edge is flush with the bottom edge of the PVC pipe. Drill three holes equally around where the center body of the coupler would be.
These holes should be the same size for the pop rivets that you will use to secure the coupler to the PVC pipe.
When connecting the staff sections, place an "O" ring on each of the male ends of the connectors to give the tubes a water tight fit.
Next insert the 1" x 1/2 threaded rod into the coupler and then add the end cap. This is the adapter set up for other connections, such as a spear tip, frog gig tip, walking tip, etc.
Next, wrap the body of the staff length wise with the black duct tape until the body is completely covered. This tape can be used later in an emergency if needed and also helps to melt snow if you fill one of the tubes to make drinking water.
Next, wrap the top portion of the staff with the para-cord to make a handle grip. The cord is also used in an emergency if needed. Allow the staff to try for a day so that the connections bond tight.
Use the plastic coin tubes to hold small stuff or kits. This, I believe, is a reliable staff for emergencies. Do not place all your weight on this staff or it may break. If used properly, it will help is walking uphill and downhill and to help keep your balance. The staff also allows you to check ahead of your steps in tall grass for possible holes and hidden critters like snakes.
Have fun with your new survival staff.
Stay Prepared! Stay Alive!
Charlie
Brilliant!!! Thanks for posting such thorough directions, it's exactly what I was looking for!
ReplyDeleteSBS in TX
Charlie, what is the approx. weight of the staff? Thanks!
ReplyDeleteThe staff weighs approx. 7-8 pounds empty.
DeleteGreat idea! Thanks for posting!
DeleteCharlie, thanks for the reply. I'm a woman, and it really helps to know what things weigh! I will be passing this info on to my grown sons, I know they will be excited to do this project! Keep up the good work, you've helped a lot of people.
ReplyDeleteGreat project. What do you keep inside?
ReplyDeleteThanks.
emailalanwalker@gmail.com
Fishing kit, small knife, small flashlight, aluminum foil, medicines (asprine, immodium, tylenol, blood pressure meds) small first aid kit, snare wire, two types of fire starters, water purification straw, zip lock sandwich bag, para-cord, electrical tape, duct tape, .22 cal ammo, compuss.
DeleteThe threaded adapters I find only screw together easily for a couple of turns. Did you have to do something to them or where did you get ones that turn easily the whole length?
ReplyDeleteThe materials were purchased at my local Lowes building supplies. What I had to do was put some Vaseline on the threads and screw them on tight as far as I could go without breaking something and then backing then backing off. I did this a couple a time to where I could screw it on by hand a few more turns. Mine does not have too many turns to screw on. That is why I added the rubber "o" ring to help keep water out. The thread shaft is tapered on purpose to create a tight fit when being used for its purpose.
DeleteDont see many NEW posts..///
ReplyDeleteJust watched your Video on Syrvival staff...Great job
Looking to Travel out west/Desert for some Survival tarining...any advice...thoughts..???
Thanks
MIKE